Thursday 20 December 2012

Using gap5 to view SAM/BAM files

The Gap5 program by James Bonfield and Andrew Whitwham is part of the Staden package, and can be used to view reads that are aligned to a genome assembly (in SAM/BAM format), and to edit the genome assembly.

Gap5 is very useful if you want to have a quick look at reads aligned to a part of a genome assembly. For example, say we have our read-to-genome stored in a BAM file 'my.bam', then we can extract reads aligning to positions 11000-13000 of scaffold 'myscaffold' by typing:
% samtools index my.bam my.bam.bai 
% samtools view my.bam myscaffold:11000-13000 > my.sam
The first line indexes the BAM file so we can pull subsets of data from it. The second line makes a sam file my.sam containing the reads aligning to positions 11000-13000 of 'myscaffold'.

We can then make a Gap5 database file out of the SAM file my.sam by typing:
% /Users/alc/Documents/Software/Staden2.0.0b9/bin/tg_index my.sam
where /Users/alc/Documents/Software/Staden2.0.0b9/bin/tg_index is the path to the 'tg_index' program within the installed Staden package (note that this path may differ on your computer, depending on where you installed the Staden package).
   This makes files my.0.g5d and my.0.g5x, which are the Gap5 database files.

To start up Gap5, you double-click on the Gap5 icon within the installed Staden package (eg. in directory 'Staden2.0.0b9'). This starts up Gap5, and brings up the main window.


You can select 'my.0.g5d' by going to the File menu, and choosing 'Open' and then choosing the my.0.g5.d file. This will bring up the 'Contig selector' which has your contigs (in this case just one contig 'myscaffold'):
To view the reads aligned to a contig/scaffold, in the main window, go to the 'View' menu and choose 'Template Display', then choose your contig/scaffold of interest. This will bring up a picture of the contig/scaffold with the aligned reads:
In this case, there are quite few reads, so they are hard to distinguish from the white horizontal line.

To view the alignments of individual reads, click on the white horizontal line. This brings up a view of the alignments of individual reads:
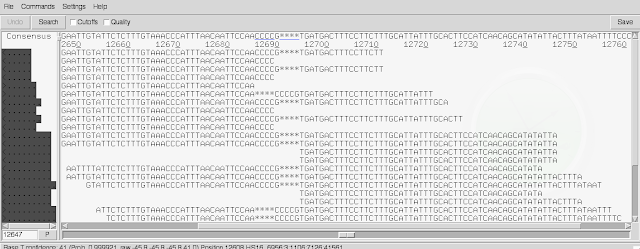

There are two scroll-bars across the bottom. The top one lets you move shorter distances, and the bottom one lets you move large distances. In the line at the top of the screen you can see the consensus sequence inferred for the genome sequence by Gap5, based on the read alignments.

By default, soft-clipped bases are not shown. If you tick the 'Cutoffs' box at the top of the window, they will be shown in pale grey.

Another useful thing to know is that by default, Gap5 gives 'padded coordinates', meaning that extra bases are inferred in the genome sequence (based on the reads) that were not in the original fasta file of scaffolds that the reads were aligned to, to make BAM file. In other words, in some cases, all the reads aligning at a position have an extra base that wasn't in the original fasta file, so this gives an extra base position in the consensus inferred by Gap5 at the top of the window. If you want to see the original reference genome coordinates (ie. coordinates with respect to the original fasta file of scaffolds) instead of the padded coordinates, go to the 'Settings' menu, and choose 'Reference coordinates'.

Thanks to Alan Tracey for introducing me to Gap5, a very nice tool.

Cigar alignments and insert sizes in SAM/BAM format

The alignments in a SAM/BAM file are stored in 'cigar' format, in which 'M' means a match or mismatch, 'I' means an insertion in the read relative to the reference genome, and 'D' means a deletion in the read relative to the reference genome.

For example, the alignment:
ACTGATTTGG- (genome)
|||||   ||
AATGA---AGT (read)
has cigar string 5M3D2M1I.

Bases at the start or end of a read may be 'soft-clipped' (usually because they are low quality sequence). This can be represented as 'S' in the cigar string. For example, the alignment:
ACTGATTTGG- (genome)
   ||   ||
AATGA---AGT (read)
in which the read bases have been soft-clipped, has cigar string 3S2MD2M1I.

Column 4 of a SAM/BAM file is the mapped position of a read. This contains the position of the reference genome that the first non-softclipped base of the read is mapped to (according to the SAM format specification). That is, it ignores soft-clipped bases at the start of the read. Therefore, if you soft-clip more bases at the start, you must change column 4.
       For example, the following alignment has cigar '3S2M3D2M1I' and start position 100:
ACTGATTTGG- (genome)
   ||   ||
AATGA---AGT (read)
If we soft-clip another base at the start of the alignment, we get cigar '4S1M3D2M1I' and start position 101:
ACTGATTTGG- (genome)
    |   ||
AATGA---AGT (read)

Column 8 of a SAM/BAM file is the mapped position of the mate. Therefore, if we changed the mapped position of a read x (by soft-clipping) as above, we must then change column 8 of the SAM/BAM for the mate of read x.

Column 9 of a SAM/BAM file has the inferred insert size of a read-pair. According to the SAM format specification this is defined by the first position of mapped position of the first read and the last mapped position of the second read (ignoring soft-clipped bases) of a read-pair. Therefore, if we changed the mapped position of a read x (by soft-clipping) as above, we must change column 9 of the SAM/BAM for read x and for the mate of read x.

For example, if you have:
read x: start-position: 144558, cigar: '5S95M'
mate of read x: start-position: 147480, cigar '2S98M'
The left-most mapped base of read x is base 144558 in the reference.
The right-most mapped base of the mate of read x is 147480 + (sum of M/D/N operations in the cigar for the mate of read x) - 1 = 147480 + 98 - 1 = 147577 in the reference.
Therefore, the insert size = 147577 - 144558 + 1 = 3020 bp.

Thanks to my colleague Martin Hunt for discussion. 

Extra note: here is a really useful page I found that explains the bit flags in SAM/BAM files.

Using the R ggplot2 library compare two variables

I was recently discussing with a colleague about how to use the R ggplot2 library to make plots to compare two variables (both of which refer to the same set of individuals), if one of the variables has error-bars, and the other variable does not. For example, the first variable could be height for a set of individuals, and the second variable be weight for those same individuals, and we may only have error bars for the weights.

For example, say you have a file 'data.txt' that contains height and weight values for three individuals (g1, g2, g3):
Individual variable value
g1 HEIGHT 22.5
g1 WEIGHT 25.0
g2 HEIGHT 50.5
g2 WEIGHT 55.5
g3 HEIGHT 1.5
g3 WEIGHT 15

We may also have error bars for the weights, that is, we may have estimated the standard errors for the weights to be 1, 8 and 15 for individuals g1, g2, and g3 respectively.

One way to do make a plot of this data is to plot bar charts for height and weight side-by-side using ggplot2, showing error bars for weight:
> MyData <- read.table("data.txt",header=TRUE)
> library("ggplot2")
> ggplot(data=MyData, aes(x=Individual, y=value, fill=variable)) + geom_bar(stat="identity", position=position_dodge())
(Note: I learnt how to do this from a nice ggplot2 tutorial.)


We can add error bars to show the standard errors by typing:
> weight <- MyData$value[MyData$variable=="WEIGHT"]
> se <- c(1, 8, 15)
> upper <- (weight + se)
> lower <- (weight - se)
> upper2 <- numeric(2*length(upper))
> lower2 <- numeric(2*length(lower))
> for (i in 1:length(upper2))
   {
         if (i %% 2 == 0) { upper2[i] <- upper[i/2] }
         else                     { upper2[i] <- "NA"        }
   }
> for (i in 1:length(lower2))
   {
         if (i %% 2 == 0) { lower2[i] <- lower[i/2] }
         else                     { lower2[i] <- "NA"         }

   }
> ggplot(data=MyData, aes(x=Individual, y=value, fill=variable)) + geom_bar(stat="identity", position=position_dodge()) + geom_errorbar(aes(ymax=as.numeric(upper2),ymin=as.numeric(lower2)), position=position_dodge(0.9),width=0.25)
(I learnt how to do this from this nice webpage.)


Another way to do this is to make a back-to-back bar chart using ggplot2:
> MyData <- read.table("data.txt",header=TRUE)
> library("ggplot2")
> ggplot(MyData,
   aes(Individual)) + geom_bar(subset = .(variable == "WEIGHT"), aes(y = value, fill = variable),     
   stat = "identity") + geom_bar(subset = .(variable == "HEIGHT"), aes(y = -value, fill = variable),   
   stat = "identity") + xlab("") + scale_y_continuous("HEIGHT - WEIGHT")
> se <- c(1, 8, 15)
> weight <- MyData$value[MyData$variable=="WEIGHT"]
> upper <- (weight + se)
> lower <- (weight - se)
> upper2 <- rep(upper, each=2)
> lower2 <- rep(lower, each=2)
> limits <- aes(ymax=upper2,ymin=lower2)
> last_plot() + geom_errorbar(limits, position="identity", width=0.25)
(Note: I did this using R version 2.11.1 and gglplot2 0.8.8.)

A third type of plot that you might want to make is a scatterplot, with error-bars for weight:
> se <- c(1, 8, 15)
> weight <- MyData$value[MyData$variable=="WEIGHT"]
> height <- MyData$value[MyData$variable=="HEIGHT"]
> upper <- (weight + se)
> lower <- (weight - se)
> ggplot(MyData, aes(x=height, y=weight)) + geom_errorbar(aes(ymax=upper,ymin=lower), width=0.25, position="identity") + geom_line(position="identity") + geom_point(position="identity")
(Again, I got some nice tips from this webpage.)

Thanks to my colleague Anna Protasio for introducing me to ggplot2!

Tuesday 27 November 2012

Using samtools to manipulate SAM and BAM files

I've been using samtools to manipulate bam and sam files during the last few days, and decided to write a few notes so that I won't forget. Here are the commands that I find most useful:

samtools faidx
samtools faidx my.fasta 
   make an index file for input fasta file "my.fasta", called "my.fasta.fai"

samtools index
samtools index in.bam in.bam.bai
   make an index file for input fasta file "in.bam", called "in.bam.bai"

samtools sort
samtools sort in.bam in_sorted
    sorts a bam file "in.bam", to make sorted bam file "in_sorted.bam"

samtools view
samtools view -h in.bam > out.sam
    convert a bam file "in.bam" to sam format file "out.sam"
samtools view -h in.bam scaffold1:155-200 > out.sam
    take reads mapping to positions 155-200 on scaffold1, and convert to sam format file "out.sam". To do this, you need index file "in.bam.bai" (see above)
samtools view -h -o out.sam in.bam scaffold1:155-200
    take reads mapped to 155-200 on scaffold1, and make "out.sam", including a header. To do this, you need index file "in.bam.bai" (see above)
samtools view -S -bt my.fasta.fai in.sam > out.bam
    convert a sam file "in.sam" to a bam file "out.bam". To do this, you need index file "my.fasta.fai" (see above)
samtools view -bT my.fasta in.sam > out.bam
    convert a sam file "in.sam" to a bam file "out.bam". To do this, you need fasta file "my.fasta".
samtools view -b in.bam scaffold1:155-200 > out.bam
     take reads mapping to positions 155-200 on scaffold1, and put in an output bam file "out.bam".
samtools view -b -s 0.60 input.bam > out.bam
     randomly samples 60% of reads in the input.bam, and puts them into output bam file "out.bam".
samtools view -H in.bam
    view only the header for bam file "in.bam"
samtools view -H -S in.sam
    view only the header for input sam file "in.sam"
samtools view -L my.bed in.bam
    get alignments that overlap positions in bed-format file my.bed, for bam file "in.bam"
samtools view -c in.bam
    count the number of read alignments in bam file "in.bam"
samtools view -f 2 -q10 in.bam > out.sam
    take just the read-pairs that are 'proper pairs' (-f 2: gives 'proper pairs'), with minimum mapping quality of 10
samtools view -f 0x400 in.bam
    take just the reads that are marked as duplicates in your bam
samtools view -F 0x400 in.bam
    take just the reads that are not marked as duplicates in your bam  
(samtools view -H in.bam; samtools view in.bam | grep -w NH:i:1) | samtools view -bS - > out.bam
take just the uniquely mapping reads, that map with MAPQ score of >=30 
bwa mem genome.fasta reads_fastq.gz mates_fastq.gz | samtools view -b -S -F 4 - > output.bam
   run 'bwa mem' to align reads and their mates to a genome, and pipe the output through samtools to just take the reads that align (using -F4) and discarding reads that don't align (to save disk space), and put the output in output.bam

samtools mpileup
samtools mpileup in.bam
    get mpileup output for bam file "in.bam"
samtools mpileup -l my.bed in.bam
    get mpileup output for reads that overlap positions in bed-format file my.bed, for bam file "in.bam"

samtools merge
samtools merge out.bam in1.bam in2.bam
    merge two BAM files, in1.bam and in2.bam, to create out.bam  

samtools idxstats 
samtools idxstats in.bam
    gives the length, number of mapped reads, and number of unmapped reads for each scaffold/chromosome for which there is data in in.bam, etc.

samtools flagstat
samtools flagstat in.bam
    gives statistics about your bam file, such as the total number of reads, number of mapped reads, number of properly paired reads, number of reads marked as duplicates.

Converting BAM to Fastq and vice versa
Apparently, you can use Picard's SamToFastq to convert bam/sam files to fastq format. 

Tuesday 20 November 2012

How to profile your perl script using nytprof

To figure out which part of your perl script is taking most of the time, you can "profile" your script.

I recently came across a blog by Jerome Quelin on how to profile your perl script using the nytprof profiler.

It's very easy to do this, you just type:
% perl -d:NYTProf script.pl
where script.pl is your perl script.

You then type:
 % nytprofhtml

This makes a directory called "nytprof" in which you will find a file "index.html".

If you look at the index.html file in a web browser, you will see a nice breakdown of which of how much time is spent in each subroutine of your perl script.

Here is what the output looks like, in this case the output for my perl script run_genewisedb_afterblast.pl:

In this case, it tells us that 146s of exclusive time was spent on system calls. We can click on 'CORE:system' in the first line to find where these system calls occurred in the code, and how much time each one took:


This is very handy for pinning down which bit of your code is taking up the most compute time, to help you think how you could speed it up.

Thursday 15 November 2012

Running GeneWise with HMMs #2

In a previous post about GeneWise, I talked about how to run GeneWise using HMMs of gene families, for example, HMMs of animal gene families from TreeFam.

I mentioned my perl script run_genewisedb.pl that runs GeneWise, by comparing each HMM in an input file of multiple HMMs, to each DNA sequence in a fasta file of multiple sequences.

A problem with this script is that it can be quite slow to run on a whole animal genome of several hundred megabases, using a large number of HMMs (eg. all ~16,000 HMMs for TreeFam families).

I've now written a second script, run_genewisedb_after_blast.pl, which lets you run GeneWise using HMMs, but only on the regions of DNA sequences that have tblastn matches for the proteins used to create the HMMs.

As one of the inputs for this second script, you need to give it a fasta file of the protein sequences used to create the HMMs. If you are using TreeFam HMMs, you can create this fasta file of protein sequences using my perl script get_treefam_family_seqs.pl.

The perl script run_genewisedb_after_blast.pl cuts down the run time of running GeneWise a lot, as it only runs GeneWise on regions of the DNA sequences that have good tblastn matches to proteins in the families used to create the HMMs. You can specify an e-value cutoff for the tblastn matches to control how strong a tblastn match must be, and also specify how many bases on either side of the tblastn match to include in the chunk of sequence given to GeneWise.

Tuesday 13 November 2012

Using the geometric distribution in R for bioinformatics

A geometric distribution G(p) with parameter p provides a probability model for the number of trials up to and including the first success in a sequence of independent trials.

Its probability mass function is:

where q = 1 - p.

For example, we could make a model of a DNA sequence that contains CpG islands, where we assume that, travelling from 5' to 3' along the sequence after entering a CpG island, there is a probability of p of leaving it, and q = 1 - p of staying in it, at a subsequent base position.

Thus,  assuming we start off within a CpG island, p(n) gives us the probability that we will have to look at n bases along the sequence to see the first non-CpG base.

In other words, we are taking a non-CpG island base to be a "success", and p(n) gives us the probability that we will have to look at n bases (n trials) to see a non-CpG island base (a success).

Say p = 1/6, which would give us the probability mass function:

For example, we can calculate that the probability that it will take us three bases to reach a non-CpG island base as:

which is equal to 0.1157407, which is 0.116 rounded to three decimal places.

In R we can calculate this using the "dgeom()" function, which calculates the probability mass function (p.m.f.) for a geometric distribution.

The dgeom() function in R takes as its argument (input) the number of failures before the first success. Therefore, in the case were we want to calculate the probability that it will take us three bases to see the first non-CpG island base, this means we want the probability of seeing two failures (CpG island bases) before the first success. Thus, we call dgeom() with argument 2:
> dgeom(2, prob=1/6)
[1] 0.1157407

We can use R to make a plot of the probability mass function for the number of bases it takes us to reach a non-CpG island base:
> myx <- seq(1,30,1)
> myy <- dgeom(myx-1, prob=1/6)
> plot(myx, myy, type="h", col="red", lwd=1.5, xlab = "Number of bases it takes to reach a non-CpG island base", ylab = "p(x)")

The cumulative distribution function for a geometric distribution is given by:

For example, if we want to calculate the probability that it will take us at most 3 bases to see the first non-CpG island base (ie. that we will see a non-CpG island base at either the first, second or third base along), we calculate:
 which is 0.4212963, or 0.421 rounded to three decimal places.

The "pgeom()" function in R gives us the cumulative distribution function (c.d.f.) for a geometric distribution.

Like the dgeom() function, the pgeom() function takes as its argument the number of failures seen before the first success. Therefore, if we want to calculate the probability that it will take us at most 3 bases to see the first non-CpG island base (ie. that we will see at most two CpG island bases before we see a non-CpG island base), we write:
> pgeom(2, prob=1/6)
[1] 0.4212963

To see an example of use of geometric distributions in research, you can look at a paper by Hsieh et al (2009), who modelled the lengths of CpG islands in the human genome using a geometric distribution.

Other examples of the use of geometric distributions in bioinformatics are:
  • calculating the probability that, travelling along a DNA sequence from 5' to 3', it will take us n bases to find a non-intergenic base,
  • calculating the probability of seeing a restriction fragment of length n (ie. the probability that, travelling along a DNA sequence from 5' to 3', it will take us n bases to encounter a base that starts with a restriction site),
  • calculating the probability of seeing an ORF of length n codons (ie. the probability that, starting with a start codon, and travelling along a DNA sequence codon-by-codon from 5' to 3', it will take us n codons to encounter a stop codon)


Monday 12 November 2012

Using the binomial distribution in R for bioinformatics

The binomial distribution B(n, p) provides a probability model for the total number of successes in a sequence of n independent trials, in which the probability of success in a single trial is p.

It has the probability mass function:
For example, if we have a DNA sequence that is n=100 letters long, and we know that the probability of A in a sequence is p = 0.14, then the probability of observing 20 "A"s in the DNA sequence can be calculated as:
Using a calculator, we can calculate this to be about 0.02579813.

Alternatively, using R, we can calculate using the "dbinom()" function, which gives you the value of the probability mass function (p.m.f.) for a particular value of x:
> dbinom(20, size = 100, prob = 0.14)
[1] 0.02579812

We can also make a plot of the probability distribution (probability mass function) for the  number of As obtained in a 100-base sequence (when the probability of A in the sequence is 0.14):
> myx <- seq(0,100,1)
> myy <- dbinom(myx,size=100,prob=0.14)
> plot(myx, myy, type="h", col="red", lwd=1.5, xlab = "Number of As", ylab = "p(x)")


We can also use the binomial distribution to answer questions such as: how likely are we to observe at least 28 As in a 100-letter DNA sequence, if the probability of an A is p = 0.14? 

In R we can calculate this using the "pbinom()" function, which gives you the cumulative distribution function (c.d.f.) for a particular value of x:
> 1 - pbinom(27, size = 100, prob = 0.14)
[1] 0.0001954555
Here pbinom(27, size = 100, prob = 0.14) tells us the probability of observing up to 27 As in the DNA sequence. Therefore, 1 - pbinom(27, size = 100, prob = 0.14) gives us the probability of observing 28 or more As.

Another way of answering the question would be to simulate a large number (eg. 100,000) sequences of length n = 100, in which the probability of an A is p = 0.14, and seeing in what fraction of those sequences we see 28 or more As. We can do this in R by using the "rbinom()" function, which generates random numbers using a particular Binomial distribution:
> x <- rbinom(100000, 100, 0.14)
> summary(x >= 28)
This tells us that 19/100000 of the simulated sequences have 28 or more As, and so we can estimate that the probability of observing at least 28 As (ie. 28 or more As) is 0.00019. This is quite similar to the correct value of 0.0001954555 calculated using pbinom() above.

Of course, the use of the binomial distribution for these calculations assumes that the probability of A is equal at each position of the sequence, and does not depend on whether A/G/C/T is found at adjacent positions in the sequence.

A nice example of a published paper that uses the binomial distribution is by Li et al. (1998), who modelled the number of C/G versus A/T bases in n-bp chunks of yeast chromosomes using a binomial distribution. Interestingly, they found that when they looked at short chunks of yeast chromosomes (small n), the binomial distribution approximates the data well. However, for longer chunks of yeast chromosomes, the binomial distribution fails to fit the data.

Other examples of uses of the binomial distribution in bioinformatics include:
  • calculating the probability that a certain position in a DNA sequence is or is not the beginning of a restriction site
  • calculating the probability of a certain number of A alleles being seen in a population (at a locus with two alleles (A, a)) at generation x + 1, given the frequency of A alleles in the population at generation x
Acknowledgements: thanks to Roger's equation editor for making the images of equations.

Friday 9 November 2012

Getting alignments for all animal gene families from the TreeFam database

The TreeFam database includes multiple alignments (and phylogenetic trees based on those alignments) for all animal gene families, which is about 16,000 gene families in total. This can be a useful start-point for an evolutionary analysis of which gene families are present in which species, and how those gene families have evolved over time.

The data in TreeFam is stored in a mysql database, and you can either connect to and search the mysql database directly, or you can use Perl scripts to query the database.

I've recently written a perl script get_treefam_alns.pl that you can use to retrieve the multiple alignments for the proteins in all ~16,000 TreeFam families from the TreeFam mysql database, for a particular version of the TreeFam database (eg. this script works for versions up to the latest version, TreeFam-8). The multiple alignments are retrieved in cigar-format (the format that they are stored in, in the database).

In order to convert from the cigar-format alignments to fasta-format multiple alignments, you will then need to run my perl script translate_treefam_cigars_to_alns.pl on the output from get_treefam_alns.pl. This will give you nice fasta-format multiple alignments for all ~16,000 TreeFam families. 

Estimating the mean insert size in a BAM file

If you have a very large BAM file of read-pairs mapped to a genome, it can often be interesting to have an estimate of the mean insert size for the read-pairs. To do this, you can use my script find_bam_insertsize.pl which estimates the mean, median, standard deviation and interquartile range of insert sizes in a given BAM file.

To do this, the script takes the first one million read-pairs in the BAM file, and then takes the subset of those that are 'proper' read-pairs (are mapped in the correct orientation and within a defined insert size, so have flags of 99, 147, 83, or 163 in the BAM file, as described in this nice blogpost). The mean, median, standard deviation, and interquartile range of the insert sizes of these proper read-pairs is calculated.

Using Picard CollectInsertSizeMetrics.jar
Another way to do the same thing is to use Picard CollectInsertSizeMetrics.jar
[Note to self: I need to run this on pcs4, by first typing 'ssh -Y pcs4', as it seems to need to write a graphical output to the screen.]
% /software/bin/java -Xmx128M -jar /software/varinf/releases/PicardTools/picard-tools-1.77/CollectInsertSizeMetrics.jar INPUT=input.bam OUTPUT=out.metrics HISTOGRAM_FILE=out.hist
where input.bam is the input bam file, out.metrics is the output file with insert size metrics, out.hist is the output file with a histogram of insert sizes.

The output file 'out.metrics' has the insert size metrics, which we can pull out:
% cut -f1,5,6,13,22 out.metrics | more
MEDIAN_INSERT_SIZE    MEAN_INSERT_SIZE    STANDARD_DEVIATION    WIDTH_OF_50_PERCENT
399    395.536998    72.923077    79
This tells us that the median insert size is 399 bp, the mean is 395.536998, the standard deviation is 72.923077 and the IQR is 79 bp.

Monday 5 November 2012

Running GeneWise with HMMs

A nice feature of Ewan Birney's GeneWise software is that GeneWise can use HMMs of gene families to help predict genes in DNA sequence.

This can be done using:
% genewise <hmmfile> <fasta> -hmmer ... [other options]
where <hmmfile> is your HMM file, and <fasta> is the fasta file for your DNA sequence.

In a previous post, I described how to train GeneWise so that it uses a splice site parameter file that has been trained for your species.

If you want to run GeneWise with HMMs, and also want to use a splice site parameter file for your species, you will need to type:
% genewise <hmmfile> <fasta> -hmmer -genestats <paramfile> -nosplice_gtag  ... [other options]
where <paramfile> is your splice site parameter file.

The above command can only be used to compare one HMM to one DNA sequence.

The GeneWise software comes with a program called genewisedb, which can be used to compare multiple HMMs to a fasta file of multiple sequences. However, unfortunately, genewisedb does not have the -genestats option, to allow you to use your own splice site parameter file.

If you want to use the -genestats option, to use your own splice site parameter file, you can use my perl script run_genewisedb.pl to run genewise, by comparing each HMM in your input file of multiple HMMs, to each DNA sequence in a fasta file of multiple sequences.

Training GeneWise for your species


Ewan Birney's GeneWise software is a very nice gene-finding software that can find genes in a newly sequenced genome by using comparisons to proteins from other species, or HMMs of gene families from other species.

There are a couple of different ways that GeneWise can deal with introns. If you use the command:
% genewise -splice_gtag .... [other options]
then GeneWise will assume that the introns in your species all start with 'GT' and end with 'AG'. This is generally true, but a small proportion of introns in each species start and end with other sequences.

Alternatively, you can use an intron splice site file, which is a parameter file that tells GeneWise what sequences to expect near the splice site of introns (including several bases upstream and downstream of the start and end of the intron).

GeneWise comes with an intron splice site file for human (file "gene.stat"), which is the default parameter file used by GeneWise, if you just type:
% genewise ... [other options]

However, it can often be nice, if you have training data, to train GeneWise for your species. To do this, you first need a set of training genes that you know are correctly predicted (eg. genes confirmed by full-length mRNAs) or are probably correctly predicted (eg. genes predicted by Ian Korf's CEGMA software).

If you have a GFF file of the coding exons in your training genes, you can then use my perl script make_genewise_paramfile.pl to make a splice site parameter file for GeneWise for your species.

You can then use the GeneWise parameter file by typing in GeneWise:
% genewise -genestats <paramfile> -nosplice_gtag ... [other options]
where <paramfile> is your parameter file made using make_genewise_paramfile.pl.

Note that the GeneWise parameter file made by make_genewise_paramfile.pl just has the splice site information trained from your training data; other parameters in the parameter file are copied from the human splice site file ("gene.stat") that comes with GeneWise.

Thursday 1 November 2012

Installing GeneWise - Wise2.4.1

Today I installed the latest version of GeneWise, part of Ewan Birney's Wise2.4.1 package (http://www.ebi.ac.uk/~birney/wise2/), on the Sanger compute farm. First I typed the following:% tar -xvf wise2.4.1.tar.gz
% cd wise2.4.1
% cd src
% make all
However, this gave me an error message, and there was no src/bin subdirectory made, so the installation had failed.

After a quick websearch, I found Ian Korf's notes on installing Wise2.4.1 (http://korflab.ucdavis.edu/datasets/cegma/ubuntu_instructions_1.txt), and based on that I did the following:

1) I typed:
 % setenv WISECONFIGDIR /nfs/users/nfs_a/alc/Documents/GeneWise/wise2.4.1/wisecfg/

2)  I then edited the file src/makefile to change line 25 from 'CC = cc' to 'CC = gcc'.

3) I then edited the file src/dyc/makefile to change line 26 from 'CC = cc' to 'CC = gcc'.

4) I then edited the file src/models/phasemodels.c to change line 23 from 'if( !isnumber(line[0]) ) {' to 'if( !isdigit(line[0]) ) {'

5) I then typed (in the subdirectory src):
% make all

This worked fine, I now have a src/bin subdirectory with executables 'genewise' and 'genewisedb'. Hurray!